Showing posts with label Recipe. Show all posts

Without a doubt the best curry I've ever made.

Completely stolen from BBC Good Food.

I normally gravitate away from home-cooked curry and towards the take-away variety, for the well known reason that it's just not the same. While creation in a saucepan from a spoonful of paste, chopped vegetables and diced chicken is time-efficient, flavours are generally disappointing. On noticing my purchase of a box of Taste the Difference chicken thighs & drumsticks (£1.19 from £4.75 in the reduced section), my housemate shared this recipe with me for which, due to our impressive spice rack, I only needed a few extra items. 

Action shot

 Marinade:
  • 2 chicken thighs cut into two (or 4 and omit drumsticks)
  • 2 chicken drumsticks
  • 120g yoghurt
  • 2 tbsp ginger and garlic paste
  • 1½ tsp salt
  • lemon, juice only
  • 3 tsp red chilli powder
  • 1 tbsp ground cumin
  • ½ tsp garam masala
  • drizzle of oil

Oven 200ºC. Make cuts in the chicken pieces with a corrugated knife to help the marinade absorb. Mix the remaining ingredients in a bowl then pour over the chicken in a dish lined with foil, making sure each piece is coated. Chill in the fridge for 10 minutes. Roast the chicken for around 15 minutes, turning halfway to ensure even browning. The chicken does not need to be fully cooked as it will be added to the sauce later. Set aside and keep the juices. 


Sauce:
  • 2 tins plum tomatoes
  • 5cm/2in piece fresh root ginger, peeled, half crushed and half finely chopped
  • 4 garlic cloves, peeled
  • 4 green cardamom pods
  • 1 bay leaf
  • 1 tbsp red chilli powder
  • 80g butter, diced
  • 2 green chillies, slit lengthways (I used a smallish one and a large green birdseye)
  • 3 tbsp coconut cream/single cream (optional)
  • 1 tsp salt
  • 2 tsp fenugreek
  • ½ tsp garam masala
  • salt and pepper
  • 2 tbsp chopped fresh coriander, to garnish

Place the tomatoes in a pan with 125ml/4fl oz water, the crushed ginger, garlic, cardamom and bay leaf. Simmer until just before the boil and blend with a hand blender in the pan. Add the chilli powder and simmer for 12-15 minutes. It should slowly begin to thicken. When the sauce turns glossy, add the chicken pieces and the cooking juices. Pour in a cup of water and simmer for about 3-5 minutes, or until the water is absorbed and the sauce returns to its original glossy consistency. Slowly whisk in the butter, a couple of pieces at a time, and simmer for 6-8 minutes, or until the chicken is cooked through and the sauce is beginning to acquire a glaze. Add the chopped ginger, green chillies and cream and simmer for a minute or two longer, taking care that the sauce doesn't split. Stir in the salt, fenugreek leaves and garam masala, then check the seasoning. 


Serve on a bed of basmati rice (100g per person) and garnish with fresh coriander. Excitedly run  around the kitchen exclaiming 'it looks like a REAL curry!'


Hard work? There's just no knead.

Another post, another bread recipe. Inspired by a blog favourite of mine Budget Bytes, I prepared this unbelievably easy focaccia in time for a dinner party turned booze-up at fellow food enthusiast Hester's apartment. The guests were impressed.

I felt almost embarrassed to take compliments for something that was so simple to make, but not so embarrassed that I didn't glowingly reply 'it was nothing'. (It really was.)


Not out of place at a gourmet meal

Ingredients:

120g wholewheat bread flour
360g white bread flour
1/2 teaspoon instant yeast
1 1/2 teaspoons salt
480ml water
3 tablespoons olive oil (the better the quality, the better the bread)
Sprinkling of herbs - salt & rosemary is a classic combination, or basil and garlic

Method:

Add all of the dry ingredients to a large bowl and stir. Add the water and stir gently with a spoon until the mixture is combined and in a sticky ball. Cover loosely with a tea towel and let sit overnight/about 14 hours.

When you're around 2 hours before needing the dough to be ready, prepare a tin with oiled greaseproof paper or foil and and pour the dough onto the sheet. Stretch to the edges of the tin and let sit for another hour. Poke dimples in the dough and drizzle with extra olive oil, don't worry about adding too much. Sprinkle with extra herbs and salt. 

With the oven preheated to 200°C, place a sheet of foil over the mixture and bake for 20 minutes. Remove the foil and bake for a further 20 minutes, or until brown.
 Wait until cooled to slice or enjoy hot.

If you're worried about cooking times or leaving the dough for too long, you could always mix the dry ingredients before you go to bed and add the water when you get up in the morning. Minimum time and effort involved, and lovely risen dough for when you get home.


Prep time: Around 16 hours (the majority of which you will be sleeping for)
Hands-on time: 20 minutes
Oven time: 40 minutes


Extra step-by-step photos:


Naan Bread

Bread always seems like one of those foods only to be tackled by those who know what they’re doing - ‘leave it to the professionals’ - you probably think. No matter how many times you've baked a cake, made cookies or cupcakes, there’s something daunting about using yeast. What if it goes wrong?!

Really, it’s just as likely to go wrong as a cake, and in turn, just as likely to go right.

Flatbreads are a lot easier than loaf-style breads as there is little work in the way of kneading and shaping. Proving means it takes that little bit extra longer than making a cake, but if you plan ahead you’ll have fresh naan quicker than you can walk to the shop and buy a packet. And nothing makes you feel more like a genius than when your own bread looks like REAL bread, (except maybe getting a 1st in your degree, but never mind that when you can make naan).


Ingredients:

Makes 6-8
½ packet dry active yeast
1 tsp sugar
110ml room-temperature water
Around 400g wholemeal or white bread flour (I used wholemeal)
½ tsp salt
50ml oil (vegetable, olive, any)
75ml natural/greek yoghurt
1 egg

Directions:

In a large bowl, mix the yeast, sugar and water. If the water is cold from the tap, warm in the microwave for 10 seconds to help to activate the yeast. Let sit for a few minutes until the mix seems bubbly and slightly frothy. Then stir in the oil, yoghurt and egg. Add the salt, and work in the flour about a third at a time until well combined. Keep adding flour until the mix becomes doughy and you are unable to stir it. At this point, turn out the dough onto a floured worktop and begin kneading for around 3 minutes until the dough is smooth and soft but not sticky. Use your own discretion with the amount of flour, you may not need it all or you may need a little more. Cover the dough with a tea towel and leave in a warm or room temperature place (DON’T leave it in the oven on low – I did this and ended up with half cooked dough which went in the bin).

 Leave for around an hour or until doubled in size, then flatten the dough and cut into 6/8 equal portions. Roll each piece into a ball then flatten out to circle-resembling shapes. Heat a non-stick frying pan with a small amount of butter or cooking spray and fry each piece at a time, heating the bottom til bubbles have formed and the underside is brown, then flipping. Each naan should take about 4 minutes but it’s very easy to see done-ness by eye. Serve with curry, eat plain with butter or use as a wrap with salad and various fillings.


Bonuses:
-          Way healthier than shop-bought naan due to lack of preservatives
-          Amazingly cheap, no fresh ingredients required
-          Leftovers can be frozen and reheated in the microwave
-          Your friends will think you should go on masterchef

Next stop: paratha or peshwari naan. Anyone got a good recipe?

Sweet Potato and Tangy Coriander Chickpea Salad

I came across this recipe in my housemate's Women's Health magazine, and I loved it! I had most of the ingredients in already,and things like the spring onion can easily be swapped for red onion. Experimenting with different roast veg is something I'll be doing in the future with this recipe, and perhaps adding rice to make this a full meal rather than a side dish/salad.


Ingredients:
-Sweet potatoes, 1 large per person. 
-4 spring onions per person
-1/2 tin of chickpeas, drained
-sprig of celery, finely chopped
-juice and zest of 1/2 lemon (fresh is better)
-2 tbsps balsamic vinegar
-1stp oil
-1/4 grated nutmeg (or 1/2 tsp ground)
-1/2 tsp chilli powder
-salt & black pepper
-handful of chopped coriander

Directions: 

Roast the veg for 25 mins on 200C, tossed in spices & oil. In the meantime, mix chickpeas with all of the other ingredients apart from  spring onions—char them with the potatoes 5 mins before they’re done. The end. That’s it. Really, so easy! This would be delicious served with a piece of white fish or bulked out with lettuce leaves and roasted peppers, experiment!

Creamy Thai Satay Soup

Inspired by Half Baked Harvest

Often in the shadow of their starchy distant relative the potato, sweet potatoes are just as cheap, versatile and delicious as the mighty jacketed staple food. I use them in cooking all the time because I love the flavour that erupts from them, especially when roasted. They're also incredibly healthy. As I've bought a bag this week I'll be posting updates on what I decide to make with them, here is the first creation:


Ingredients:
- 2 large sweet potatoes. I get mine from Lidl so they are huge and vary in size every time. On average two big ones cost me 79p.
-knob of butter/glug of oil
-3 tbsp Thai red curry paste
-1 1/2 tbsp peanut butter
-Can of coconut milk (can be bought cheaply in foreign shops, look for non-branded options)
-1 onion
-1 tsp minced garlic
-Nutmeg & paprika – use according to taste/about 1/2 tsp each
-1 vegetable stock cube dissolved in 500ml hot water
-handful of chopped coriander (worth buying a plant if you have space on a windowsill, they’re normally a pound or less)
Directions: 
Oven to 200C, chop and roast the sweet potatoes in oil/butter for about 25 mins, sprinkled with the spices. While waiting, finely chop the onion and fry in a saucepan on low, adding in the garlic and curry paste when the onions have softened. Add the roasted sweet potatoes to the pan and cover with the stock and can of coconut milk, bring to the boil then simmer as you plug in the liquidiser/blender, or chop the coriander. Add all ingredients (don’t forget the peanut butter) except fresh coriander to the blender until smooth. If you don’t have a blender this soup is still delicious with chunks, but if you want a smooth consistency you could roast the potato whole, mash the insides and then add it to the onion mix. Top with a spoonful of natural yoghurt and sprinkle with coriander.
 Warning: This is DELICIOUS, you will probably struggle to restrain yourself from drinking the entire thing from the saucepan. It tastes like a soup version of satay dipping sauce. And it’s healthy!

Healthy on a budget: 5 cost-friendly pasta recipes.

Although sometimes pasta gets viewed as an 'unhealthy' option due to its high carb content, it's actually a great choice two or three times a week as part of a balanced diet. Brown dried pasta is widely available these days and will only cost you around £1 per bag - about 5 meals worth.


Roast Veg Fusilli.
Here are some interchangeable recipes for you to use with your packet. Cook pasta according to instructions (normally for wholewheat it’s about 17 minutes on a constant boil) and mix with the following toppings, delicious hot or cold:
1. Pesto.
The simplest, and possibly one of the most delicious. A jar will cost you around £1 and last for about 4 servings, it’s a flavour enhancer so try it out on a toasted sandwich with mozzarella, basil and tomato. With the pasta, simply mix about a tablespoon through the meal. Ideas: add toasted pine nuts/grated mozzarella/make your own pesto!
2.Roasted veg.
Chop vegetables such as red onion, red pepper & cherry tomatoes and roast sprinkled with a little olive oil and salt for 25mins in a 200° oven. Stir into pasta along with the cooked juices. Extras: aubergine, courgette and mushroom also work well. Think Mediterranean.
3.Butternut squash, bacon & feta.
This works best with spaghetti. Dice your squash, drizzle with oil and roast for 30 mins in a 200° oven. Grill and cut bacon into small pieces, mix everything into pasta bowl and crumble feta over the top.
4.Garlic-herb pasta.
SO simple and so sophisticated! For one: in a saucepan, melt 1 tbsp butter, add 1 clove chopped garlic and sauté for 1-2 minutes until it has begun to soften. Add cooked pasta to the pot and sprinkle in a pinch of basil, salt & black pepper. Transfer to a bowl, add fresh chopped parsley or basil and top with grated Parmesan or cheese of choice. 
Garlic-herb tagliatelle with steamed kale.
5. Sausage & tomato.
Sausages are really cheap, and you can easily up the quality of this dish by spending a little more money on the meat. If you treat yourself, you’ll notice the difference. Cut uncooked sausages into meatballs and fry in oil with chopped onion, when browned and almost done add half a tin of chopped tomatoes per person. Add basil, salt, tabasco, a drop of balsamic vinegar and a spoonful of sugar. Reduce and pour over pasta shape of choice. Extra: place in oven-safe dish and top with mozzarella, grill until melted and cheesy.
Have any fail-safe pasta staples of your own? Please share them in the comments below!

Gourmet Pizzas

Making pizzas at home is one of my favourite things to do as a group. If there are a few of you, you can club together to afford decent ingredients and at a fraction of the cost of a takeaway or restaurant pizza. It's also a lot healthier than eating out as you know exactly what's going into every component of the dish.


The most rewarding part is making the dough. Don't skip this, it's fun and will really add that authentic Italian touch to the pizza! This recipe comes from an Italian cookbook, so it's pretty legit:

Pizza Dough
- 15g packet dry active yeast
- 250ml lukewarm water
- pinch of sugar
- tsp salt
- 350-400g strong white bread flour

Place the yeast and lukewarm water in a mixing bowl, stir in the sugar with a fork and let stand for about 7 mins, til the yeast has dispersed and started to foam. Spoon in the salt and 1/3 of the flour until it becomes dough-like and starts to peal away from the sides of the bowl. Sprinkle some of the flour onto a clean work surface and knead for around 10 mins, working in the remaining flour bit by bit. This dough cannot be overworked, so it's a good idea to let everyone have a go at the kneading part. It can be quite fun to relieve any underlying anger by violently punching the dough, picking it up and throwing it at the counter.

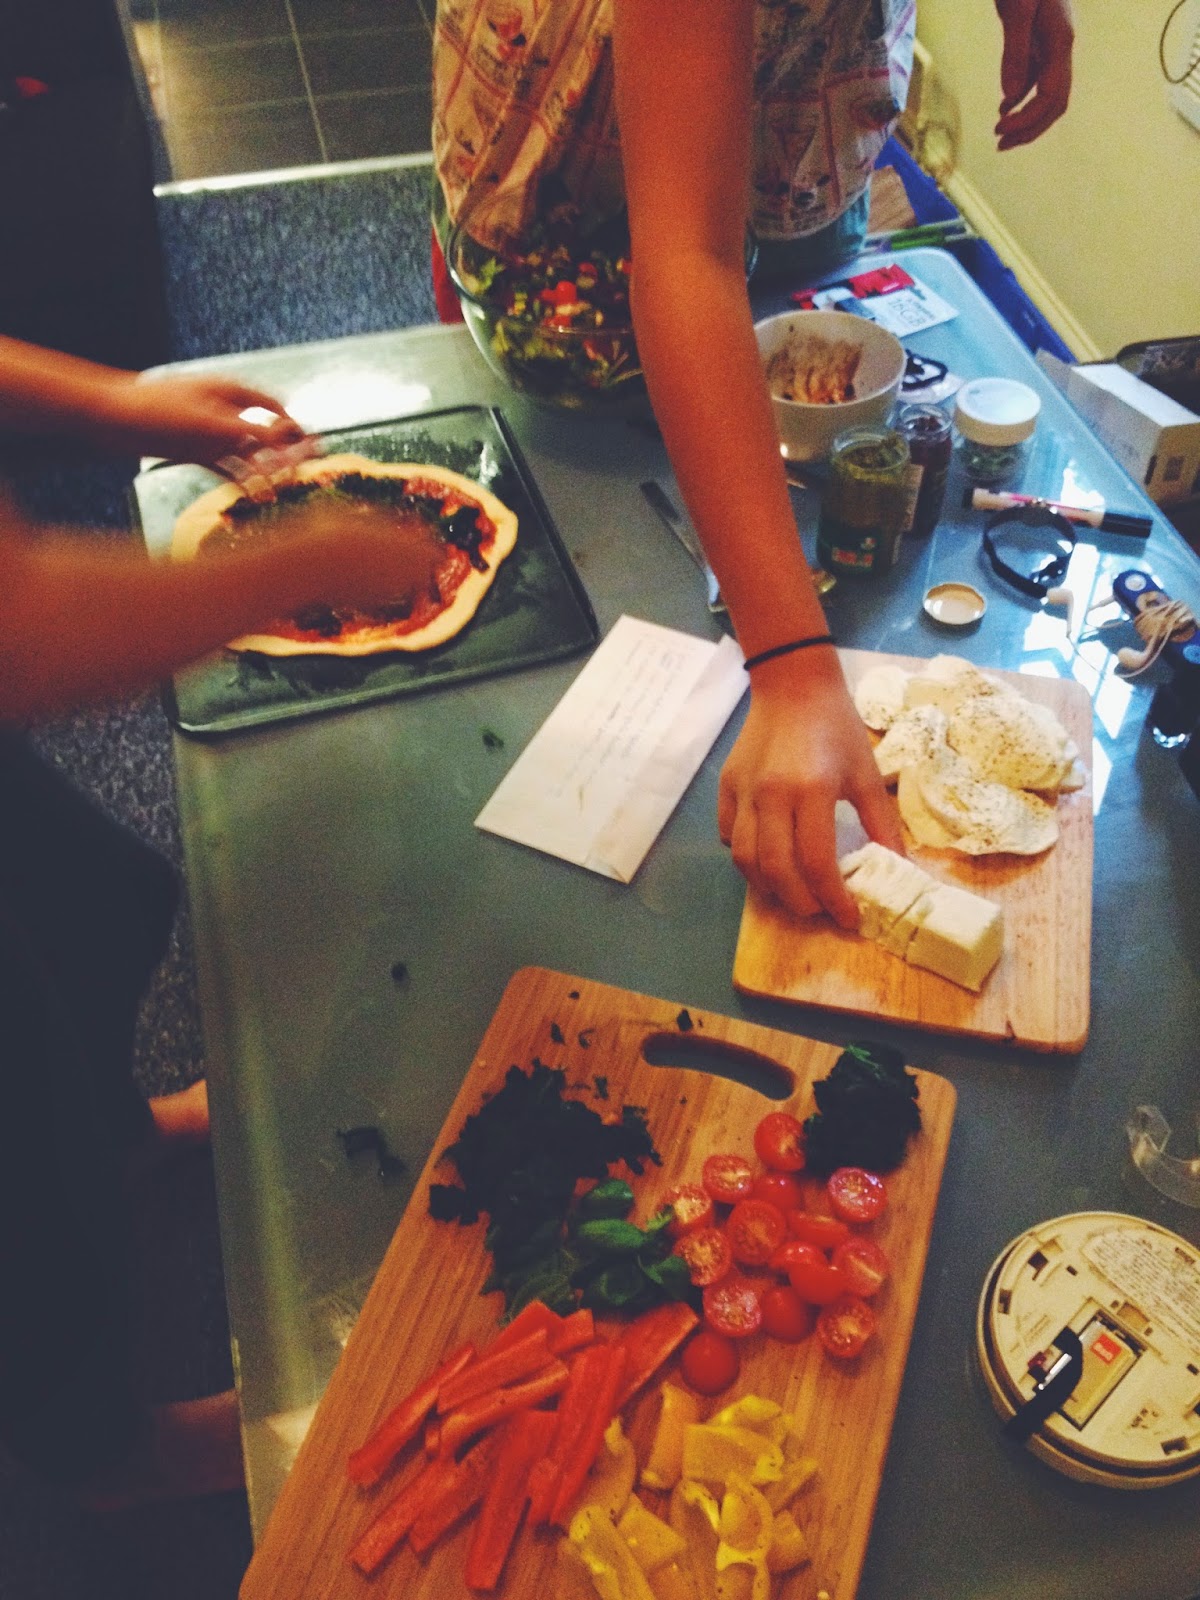
When the dough is elastic and smooth, form into a ball and place into a lightly oiled mixing bowl, drape a moist cloth over the top and leave to rise for about an hour in a warm place. I sometimes heat the oven then turn it off and leave it in there, or quickly turn all the hobs on high for a minute then turn off and leave on there. You don't want the dough to start cooking to careful that the place is not too hot. To test if the dough is proved, poke fingers into it and if the indentations remain, it's ready. Stretch the dough as thinly as possible into 4 pizza shapes, and ease into a clean roasting tin. The bases are now ready to be topped.


Every pizza should be topped with a simple passata base, this can be shop bought but just as easily home made with a few pantry staples - you might as well make everything from scratch!

Passata
- tin of tomatoes
- tbsp tomato puree
- garlic
- 1 onion
- drop of tabasco
- drop of balsamic vinegar
- spoonful of sugar
- salt & black pepper

Finely chop the onion and fry with the garlic, add everything to a blender and zizz, bring to the boil in a large saucepan and simmer for 10-15 mins til you have a delicious passata.

Now you have the base, let your imagination run wild! Experiment with weird and wonderful topping combinations, you may come across a taste sensation. Or, if your creative juices aren't yet flowing, have a gander at the tantalizing flavours my house devised and devoured.


In reverse order, saving best for last.

4. The Stuff We Had Left Over
A mish-mash pizza consisting of a few sliced peppers, onion, olives and fresh mozzerella topped with basil leaves.

3.Everything Is Better With An Egg On Top
Vine tomatoes, spinach & ricotta pesto blobs, fresh mozzerella, and a cracked egg.

2.Funghi Fish
Anchovy base with sliced & fried garlic mushrooms, fresh mozzerella and basil leaves.

1.Heaven On A Plate
Caramelised onions, goats' cheese and fresh mozzerella.


Extra tips:

- fry mushrooms in a little butter and garlic before they go on the pizza.

- to caramelise onions, cook slowly in butter for around 5 mins, add sugar and a small shot glass of brewed coffee, then reduce for around 7 mins til dark and sticky. It's almost like a chutney which is why the coffee works, but make sure there is enough sugar to balance the bitter flavour.

- It's worth spending a few extra pennies on good quality mozzerella, I find basics stuff a bit rubbery and tasteless.

- If in the oven (on about 200) the toppings are done but not the bottom, you can slide the whole pizza base-down into a frying pan to crisp it up.

Serve with fresh & vibrant salad to keep it healthy

Please let me know what interesting topping combinations you come up with!

Student Bonding: the way to anyone's heart is through their stomach.

Moving into a flat full of strangers can be daunting, especially in the first few days of settling in. Speed past this awkward phase by getting to know each other through the wonderful medium of food.


When I started studying at Manchester last year, I suggested to my flat that for the first week we take it in turns to cook for each other. Each of us picked a day and got quite excited about what we were going to make. I was lucky enough to live with quite a few international students which meant that I got to try lots of things I'd never even heard of, including Chinese baked eggs and frogs' legs. I wasn't too sure about the frogs' legs but I believe that you never know until you try!

I have loved cooking since I can remember, so I wasn't too nervous about this idea, but serving up food for a reasonably large number of people wasn't something I had really done before. I can imagine this being daunting for those who are not used to cooking regularly, but it doesn't need to be. If you stick with something simple you can't really go wrong. It's not Masterchef. It's not even Come Dine With Me—the main thing about this meal time is to spark some interesting conversation with your new flatmates, and if the food tastes great then it's a bonus. (And they'll probably like you even more.)

At this point you probably don't know everyone's tastes and preferences, so it's best to go with something simple and easy. Be sure to ask about people's dietary requirements such as vegetarian, gluten-free or vegan diets. Here's an idea to get you started:

Tortilla stack.

This is what I made in my first week, adapted from something I found on a Sainsbury's recipe card. It's cheap, delicious and suitable for vegetarians. I love this recipe because it's highly adaptable and by no means needs to be followed to the letter.

Ingredients:
Pack of 8 soft tortilla wraps (white or wholemeal)
Tin of mixed beans (kidney, borlotti, cannellini etc)
Tin of chopped tomatoes
Tin of sweetcorn
100ml vegetable stock
1 tbsp olive oil
1 onion, finely chopped
2 cloves garlic (or 1tsp jarred minced garlic)
1 tsp chilli powder
1 tsp ground cumin
1 tbsp ground coriander
Black pepper
100g cheese (any, but mozzarella or grated cheddar works well)
Optional: approx 6 cherry tomatoes for decoration

Directions:

Preheat the oven to 200ºC, add the oil to a saucepan and fry the onions for approximately 5 minutes, until soft. Stir through the spices and garlic and cook for a further minute. Pour in the stock, beans and tinned tomatoes, and let simmer for around 10 minutes until the stock has reduced. Add the sweetcorn and prepare a round cake tin with a tortilla wrap. Spoon ¼ of the bean mixture onto the wrap, and grate around 20g of the cheese on top. Repeat 3 times using up all of the ingredients, and finish with a layer of cheese. If using, dot with cherry tomatoes in pattern of your choice. Bake for 25 minutes.

To serve, slice into wedges and plate up with fresh salad. This should make enough for around 5 people, but the recipe can easily be doubled for more.

Tips/suggestions:
  • use any beans/pulses you have in, e.g chickpeas, black beans, even baked beans;
  • mix it up by trying different spices - it's a good idea to club together when buying spices as you'll have more of a range and it's a great way to flavour food for less;
  • a layer of spinach and ricotta between each section of beans is a good way to balance the stack, making it look prettier and offsetting the spice if you have used too much.
This is a reasonably easy recipe that should be accessible to all, but if you're struggling don't be afraid to ask another flatmate/whoever you may be cooking for for help! They'll probably be pleased with the chance to get involved, and if it all goes wrong you can laugh about it later. This is one part of uni where you're not getting graded. Enjoy!


See this recipe in print in The Mancunion, Issue 1.


Late night chocolate experiments

It often gets to that point in the night, not long after dinner, that I get an unstoppable craving for something sweet and deliciously unhealthy. Unstoppable, that is, without satisfying it.

Tonight I was in the mood for a thick, Spanish/Italian/Belgian style hot chocolate. Instant powder and boiling water did not fit the bill, so I threw together what cocoa products were around and success! A rich, thick, indulgent night time drink good enough to coat a hot sugary churro. 

I thought I'd write the combination down so that others may enjoy too, or at least I can refer back to this post to recreate:
  • 2 squares bourneville
  • 2 squares lindt caramel
  • 2 ts green & black's chocolate powder
  • 2 ts tesco's finest salted caramel chocolate flakes
  • 1/4 t ground cinnamon
  • mug of skimmed milk
Put all of the above ingredients into a small saucepan on low, whisk until smooth and chocolate is dissolved into milk. Heat to just below boiling, pour into mug and wait for 15 mins for the flavours to infuse. (This is the hard part). Mine developed a skin, which in my opinion is the sign of a good hot chocolate. Enjoy alone or with a traditional European questionably-shaped hot donut. Or with a questionably shaped hot European. Whatever's available. 


Note: this is not a recipe to be followed religiously - despite how tasty it is - just throw what chocolate you have into a saucepan with milk and whisk. But I will say: the darker the chocolate, the richer the taste.